Home > Edit Pages > Webpage Add-ons > Community Profiles
Community Profiles
Using this Add-On, you can allow users to create Community Profiles on your website and login to edit those whenever they choose to. For example, if you have a website which focused on Recipes, you could allow visitors to create their own profiles, thus building a "Community" arm to your Website.
To use this Add-On, go to "EDIT PAGES" in the Website Builder and select "Community Profiles" from the Webpage Addon Menu

The Community Profiles widget will be added to the first column of the page. The Community Profile widget has three sub-widgets:
Record Entry Form
Record List
Record Detail,
One of these widget can be selected to add to the web-page you are editing

Click on edit button to change the header name (if required)
: 
A new window pops up where the header can be changed.

To manage tables click on the "click here" link

On the next screen. Click on the "Add New Table" button to create a new table:

Option names are as follows:
Table Name - Enter a name for the table
Label Alignment - Choose the Alignment from the drop down box. It can be TOP or LEFT aligned
Fields in a Row- This option defines the number of controls to be displayed in a single row in the table. (Maximum 3 controls in a single row). Use the drop-down box to select the number of controls.
Receive record entries in email? - This will designate that admin will receive notifications to their email address after a table is submitted. Please check the box to select this option.
Send Auto Respond To Customers- This will send an auto-response email to users to after submission of the table. Please check the box to select this option.
Verification Code (Captcha)- This displays a verification /CAPTCHA code at the end of the table form. This Prevents automated spam being submitted through the table form.
Advanced HTML Editing - Knowledge of HTML is required to enable this option. If this funtionality is enabled you can use an HTML editor to edit the table form as per your requirement, some functionalit,y like UP/DOWN will not be available.
Is approval Required for Record entry?-This designates if approval is required for a specific entry
Is login required for Record Entry form?- Record entry will be visible only after registration or the signing-in process. Please check the box to select this option.
Is Record Editable to the Customer?- This will add Login so users/customers can login to edit their profiles.
Is Record Details Same as Record Entry Form? - Use this option if you want to keep the record detail the same as the record entry form. Please check the box to select this option.
Email Address (that the message gets sent to) - Enter the email address that the message gets sent to.
Email Addresses Cc (that the message gets sent to) - Enter the email address(s) as CC that the message gets sent to.

To change the Table Settings of a particular table, click on the "Table Settings" button next to the "Table Name"

Here you will find the same window and options to edit the table settings. Click on the "Save" button to save the changes or click on the "Back" button to return to the previous page.

To add Table Fields to a table, you need to click on the"Table Fields" button. A new window will appear on the screen.

Click on "Add New Field"

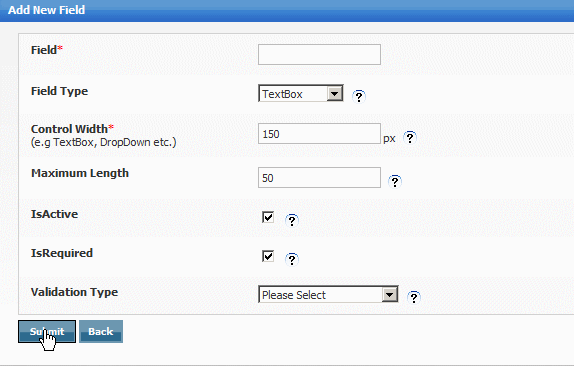
The "Add New Field" screen will appear next
The options are as follows:
Field Type - Type of field to be created in the table.
Control Width - Manages the width of the textbox field in pixels.
Maximum Length - Numbers of characters that users can enter.
Is Active - Whether or not to display the control on the form.
Is Required - Whether or not to make the field mandatory.
Validation Type - Select the validation type for the table field.
Click on the "Submit" button to Save the changes. Click on the "Back" button to return to the previous page
Check the "Is Active" box to make the Table Field available in the form. Click on "up" or "down" button to change the position of an field. Click on the "Edit" button to edit the table field properties. Check the small box all the way on the right to select the particular table field.
You can add as many fields as you like to any table/form, following the same steps outlined above

Please click on "Record responses" to view the responses from the preview or published site.

Click "Preview" and the responses from your site preview will appear here . Click on "Add New record" to add a new record. Click on the "Back" button to go back to the previous page.

Click on the "Delete Table" button to delete any particular table.

The next option is "Record Listing. Click on the "Record Listing" button to edit settings for record listings on the website.

The next page is "Manage Record Listing"
Check the "Select/Deselect" box to select or de-select any active fields. The Name of the selected field will be displayed under the heading "Selected Fields"
Check the"Is Link" button to enable the link for the selected field. Check the "Allow Sorting" box to enable sorting between the fields on your website. "Click on "Up/Down" button to change the position of the fields respectively.
Check "Is View Details link required for each record?" box to enable view details link for each record. Check the "Is sorting required?" box to enable or disable the sorting.
Select the radio button "Special Page" to display the results on a special hidden page. Select the radio button "Custom Page" to display the results on the desired page. Select the radio button "URL", if you want the results to be redirected to an external website.
Select the radio button "New Window" to display the results in a new window or else select the radio button "Same Window" to display the results in the same window.
Choose the listing layout, GRID or Catalog by selecting the radio buttons respectively.
Click on the "Update" button to save the changes. Click on the"Back" button to return to the previous page.

The next option available is "Record Details" Click on "Record Details" button to change the setting for the record details that will be displayed

The next screen will be "Manage Record Details" The Profile will appear on the screen. Check "Select/Deselect" to select or deselect any active field. The name of the selected field will be displayed under the heading "Select Fields". Click on the "Back" button to go return to the previous page.

Click on "Search Queries" to add search queries whereby users can search profiles under targeted search attributes.

The next screen will be "Manage Queries". Click on the "Add New Query" button to add a new search query.

Enter the name for the new query in the "Query Name" box. Select the radio button "Special Page" to display the results on a special hidden page. Select the radio button "Custom Page" to display the results on the desired page. Select the radio button "URL" if you want the results to be redirected to an external website.
Click on the "cancel" button to discard the changes. Click on "Return to manage record entry tables" to return to the manage record entry page.

Click on the "Edit Query" button to edit the query details. Click on the "Delete Query" button to delete any particular Query. Click on the "Query details" button to change settings for Query details.
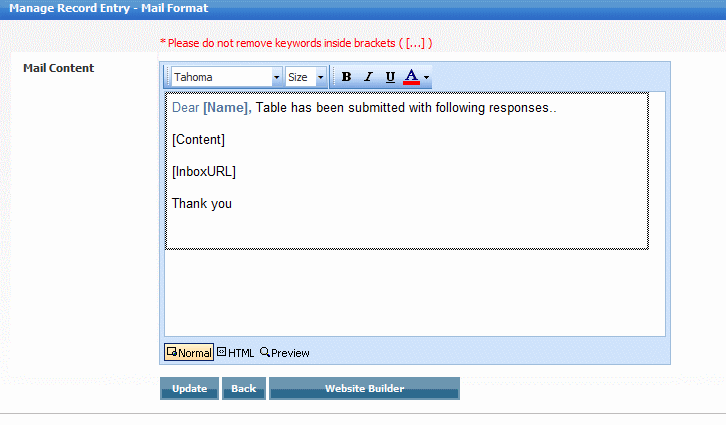
Click on THE "Record Entry-Mail Format" button to edit the record entry mail format. Click on the "Update" button to save the changes. Click on the "Back" button to return to the previous page.

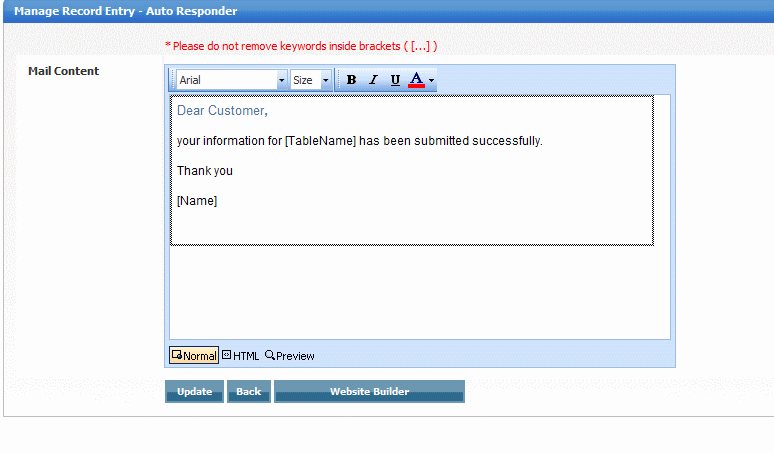
Click on "Record Entry-Auto Responder" button to manage the record entry-auto responder notification email 
See also